🎉 Publications are live! Create your very own website in seconds and share your blog posts with the world. Learn more.

7 Tips To Increase the Quality of Your Generated Blog

Andrew Petrovics
June 3, 2024
If you want your generated blog to be the highest quality possible, follow these 7 tips (roughly in order of having the highest impact of quality).
1. Use Premium Transcriptions
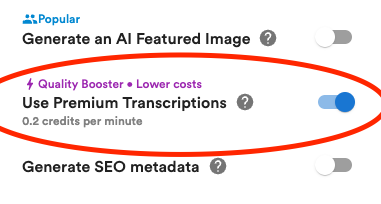
Using premium transcriptions will greatly increase the quality of your generated blog and is something that is highly recommened.
When this option is not enabled, the transcript that is on the YouTube video will be used and often that transcript is not very good (inaccurate transcriptions, no punctuation, lots of filler words, etc.) which makes it harder for AI (or even a human) to fully understand what is being discussed in the video.
However, when premium transcription is enabled, the video will get transcribed using a third party service (we currently are using Deepgram) which will result in a much higher quality transcript (and therefore, a higher quality blog).
Below is a comparison between a YouTube transcription and our Premium Transcription.
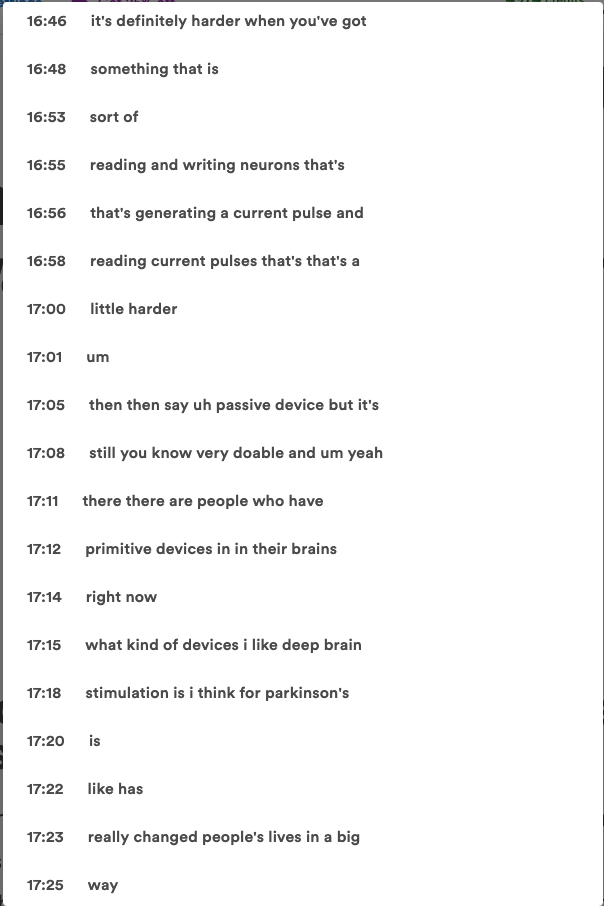
YouTube Transcription
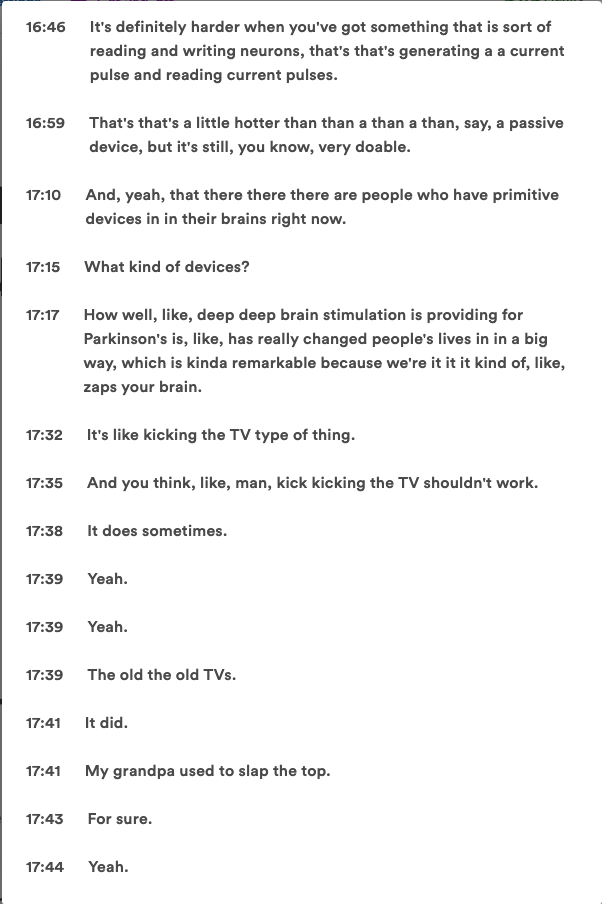
Premium Transcription
The YouTube transcription is actually not too bad in this example. Typically it is much worse, but nevertheless, you can see the difference.
Which one would you rather write a blog from? AI would too.
Please note...while this option does cost additional credits (see pricing page), you will only get charged those credits the first time the video is transcribed. Therefore, you can still regenerate your blog as many times as you would like and not get charged those same premium transcription credits again.
2. Use GPT-4
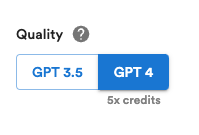
As we have recently lowered the credit costs of GPT-4 blogs (read more), we now recommend using GPT-4 if quality is important to you.
GPT-4 blogs are better written, more accurate, less hallucinations, and less likely to appear to be written be AI (which is important if you want your blog to take advantage of SEO).
3. Choose the Right Length
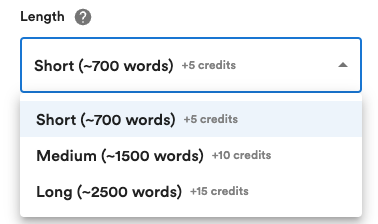
Choosing the right blog length is critical. Overall, we recommend using the shortest blog length that covers the amount of content you want in your blog.
There are a couple reasons for this...
- Shorter word counts prevent the AI from making up information and/or repeating content
- You are more likely to read and edit your blog if it is shorter
That said, we understand word counts are important to some and if you have a longer video, you want to be sure to cover all the topics.
Here are our recommendations for when the various blog length options can/should be used...
| Video Length | < 15 minutes | < 30 minutes | > 45 minutes |
|---|---|---|---|
| Short Blogs (~700 words) | |||
| Medium Blogs (~1500 words) | |||
| Long Blogs (~2500 words) |
These of course are just general recommendations and may not apply to your video (for example, if you have a 45 minute video, but only 5 minutes of that video is people talking, then you would still want to generate just a short blog).
We do not restrict trying to create longer blogs from shorter videos so you can still use any blog length option on any YouTube video, but just note that quality might suffer.
4. Use YouTube Chapters as an Outline
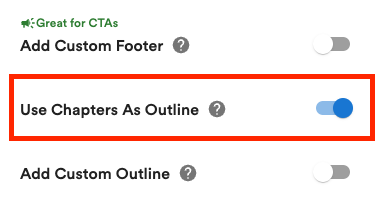
This one is pretty simple, but can have a high impact of blog quality.
By enabling this option (which is now enabled by default) you are telling the AI to use the chapters that are already on the YouTube video (if there are any) as an outline for the blog.
This greatly impacts quality in the following two situations...
- For medium or long blogs
- When auto adding screenshots
The reason this has a high impact on quality for medium and long blogs is because for those blogs we have to use multiple prompts and to do so in a cost effective way we need to be able to split the video transcript based on sections. When you use chapters as outline, we can more accurately split the transcript (do not worry, if your video does not have chapters we can still work around this by generating our own chapters but sometimes it is not as accurate as the chapters already on the video).
Similarly, the reason this has a high impact when auto adding screenshots is because we can more accurately narrow down where in the video to pull screenshots from for various sections of the blog.
If neither of these situations apply to you, you can still benefit from this option if you want to ensure your generated blog follows a similar structure as the video.
5. Add Images
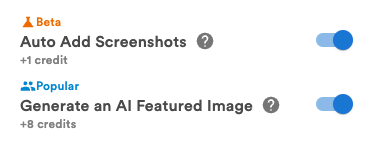
High quality blogs have images. It is that simple. Readers love visuals. It makes the blog look more professional and it gives readers more value (when the images are relevant).
We offer a couple ways to automatically add images to your blogs...
- AI generated images
- Auto screenshots
While AI generated images can be really nice and unique, we recommend only using AI generated images for a featured image because they often do not bring much value to the reader in terms of helping them better understand the written content (do not worry, you can still add AI generated images throughout the blog if you would like by typing the slash key anywhere in the blog).
If appropriate and it makes sense, we highly recommend adding screenshots throughout your generated blog. You can do this in a couple ways...
- Auto add screenshots
- Manually add screenshots
With auto add screenshots, we will get our AI to try to automatically add in relevant screenshots from the video into the generated blog. While this is often pretty accurate, it is not always correct so we also tell our AI to select some other options for each screenshot (which can be seen by clicking on a screenshot) and make it really easy to choose between them.

Easily select backup screenshots
If auto add screenshots is not working for you, you can of course add screenshots in manually. We make it really easy to do so. Just type the slash character anywhere on the blog and then click Screenshot.

Easily add screenshots manually with our screenshot selector
With screenshots it is important to not just stop at adding the screenshots, but be sure to edit them as you see fit (crop and/or annotate). You can do this by clicking on any image then clicking on the edit icon.

Edit screenshots by cropping, annotating, blurring, and more.
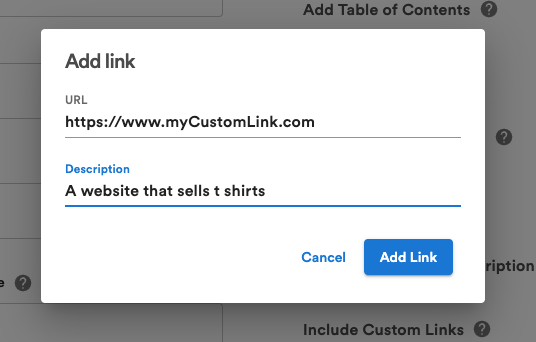
6. Include Links

Like images, including (relevant) links greatly increase the quality of any blog. It brings value to the reader by adding additional context and options to explore more. It also greatly helps with SEO as it lets search engines know more about what your content is about.
Links can easily be added manually, but we also offer ways for links to be automatically included in your generated blog in a couple ways...
- Including links from YouTube description
- Including custom links
By enabling the option to automatically include links from the YouTube description (enabled by default) the AI will automatically try to natually include any relevant links from the description into the generated blog.
If you have other links that you want to automatically include, you can also specify those links (along with a description) and the AI will automatically include those links into the blog.
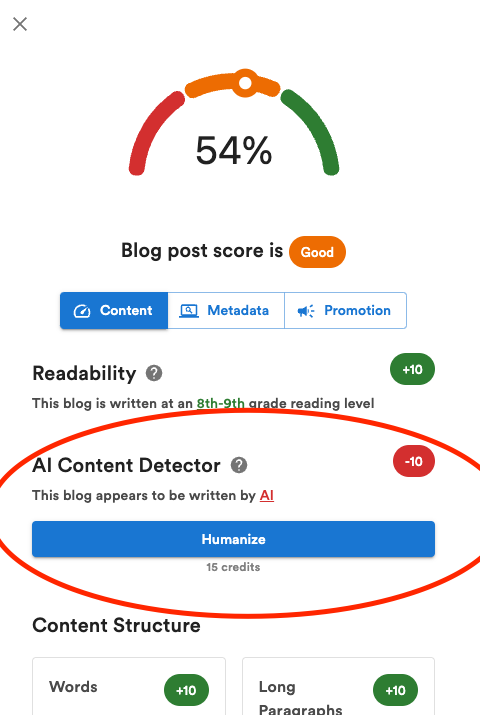
7. Humanize (if needed)

If you would like your content to not be detected as written by AI (something that is becoming more important with SEO) we offer a way to not only detect the chances that the content will be flagged as written by AI, but also, an easy way to rewrite the blog so as to be not be detected an written by AI (i.e. "humanize`" it ).
We currently use Undetectable AI for our AI content detection and humanizer.
You can view the AI content detector by clicking on the ellipsis button to the right of the Export button and then click AI Content Detection.
There, if you content is flagged as written by AI, then you will also see an button to humanize it.
There you go! Follow these tips to increase the quality of your generated blog.